Have you ever tried installing your bathroom tiles yourself? You probably don’t feel comfortable doing it and shy away from the act. If you learn how to tile your bathroom correctly, then you would realise that it is a simple process.
In this post, we have prepared a guide, packed with all the tips and trick you need when tiling your bathroom wall or floor yourself.
What are the perfect bathroom tiles for me?
The first thing to think about before going ahead to tile your bathroom should be the size of the room. It will influence a lot of other decisions you will make. Using large tiles on small bathrooms doesn’t match because they will create the illusion of a smaller room. On the other hand, small tiles on large bathrooms will incur more costs and time to complete.
The two most common tiles used in bathrooms are ceramic, or porcelain and both are quite affordable. However, porcelain tiles are usually more expensive because they are more hardwearing. Wall tiles must not be wear-resistant, so you can use any style you like.
Tiles made from natural stones are commonly used in bathrooms but are not ideal for first-timers. They are difficult to maintain and will need regular sealing. Stone and limestone tiles are the most porous and are more absorbent than the ceramic and porcelain ones.
When choosing tiles for your bathroom, do not forget to order samples first.

How many tiles do you need?
Having the right number of tiles is essential in successfully tiling your bathroom wall, and it is at this stage that the size of your bathroom is most needed. However, do not assume you know its length and breadth just by observing it. Make sure you measure your bathroom accurately.
After getting the accurate size of your bathroom, ensure that the tiles you buy are of the same units as what you measured. Also, always buy some more tiles than what you think you will need for your bathroom. You wouldn’t have to waste time or money going to get extra ones peradventure you need more.
Tools you would need to tile your bathroom
No matter the type or number of tiles you need to tile your bathroom, you will use these tools:
- A Hammer drill
- A notched trowel
- A measuring tape
- A wooden block
- Sponges
- A rubber float
- Safety goggles and knee pads
- A foam brush
- Gauge stick
- Scraper
- Tile cutter
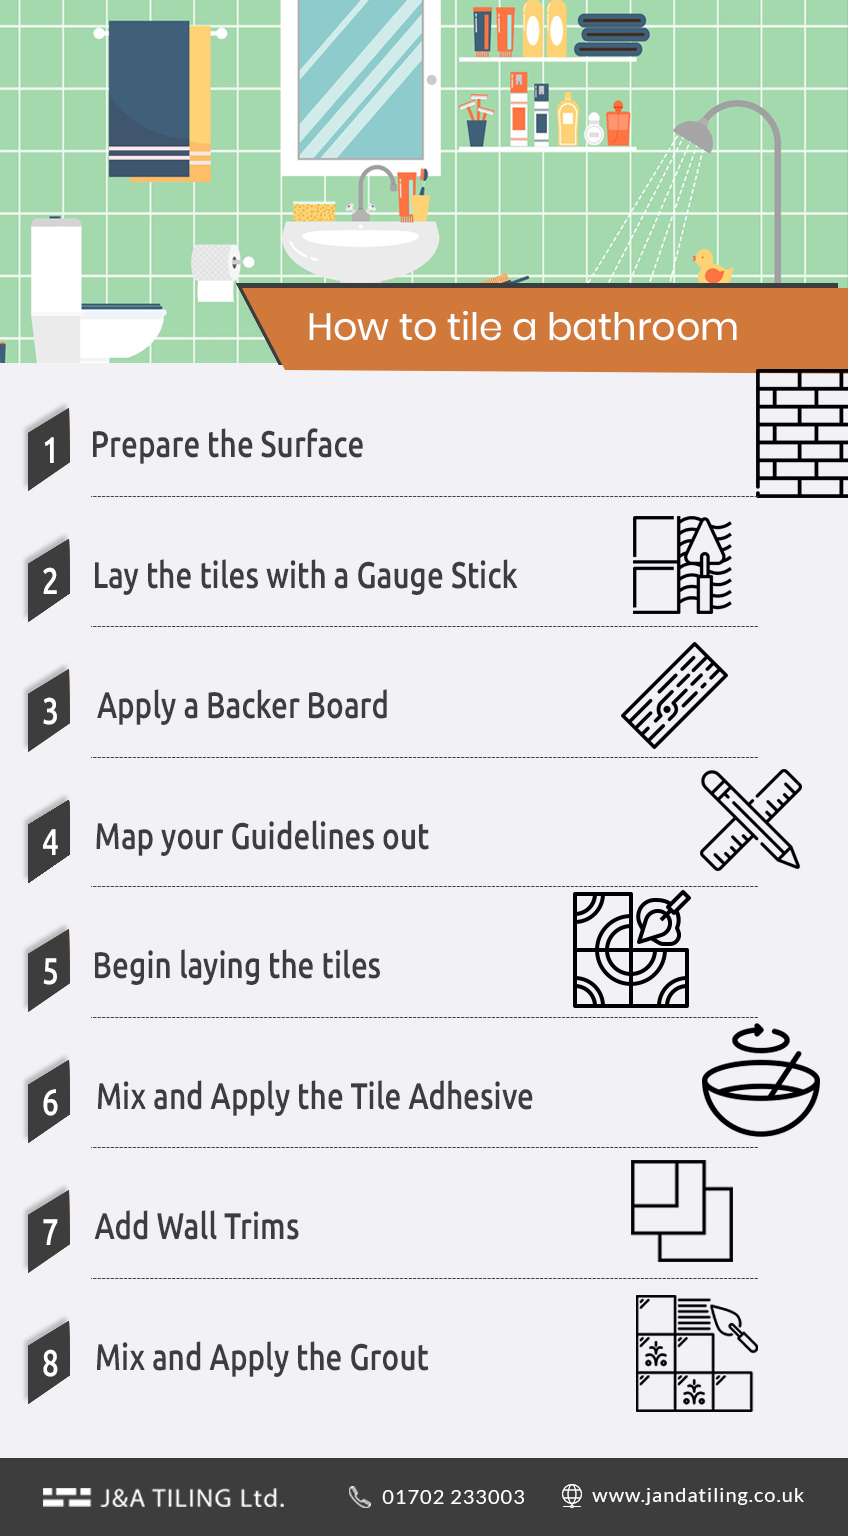
How to tile a bathroom
Follow these steps when you want to tile your bathroom.
Step 1 : Prepare the Surface
Before you begin the process, make sure your bathroom surface is adequately prepared. If you skip this step, your work will probably look unprofessional when you are done. Also, fixing mistakes that you could make would be very expensive. It would be best if you spent a lot of your time cleaning and preparing the surface you will be laying tiles on.
First, remove the old paint and wallpaper that may have been on the surface before. A scraper can come in handy to get most of these materials off. The walls then need to be washed and cleaned with a TSP solution, so all the grease and dirt can come off.
Step 2 : Lay the tiles with a Gauge Stick
Get your gauge stick out, because you would be using it to lay and space out the tiles. It is a wooden stick with markings that represent the size of the tiles. Even though they are available at local stores around you, you can make one on your own.
First, take one tile, and make sure it aligns with your gauge stick. The stick should then be marked with the end of all the tiles until you don’t have any space on it again. Remember that a tile spacer must have enough room between each tile.
You should have two gauge sticks for laying out tiles; one for the length and the other for the breadth of the bathroom.
Step 3 : Apply a Backer Board
A tile backer board is a perfect means of producing a smooth, even, and sturdy surface for tiling. However, not everyone needs one. Nevertheless, it has many benefits when used in your bathroom.
The quantity of tile backer board you need depends on the size of your bathroom, so make sure they add up. Tile backer boards come with instructions, so follow them to the letter.
Step 4 : Map your Guidelines out
It would help if you had a guideline because it will ensure that your tiles are correctly placed. The first thing to do is to find the centre point on the wall. Using a spirit level is usually the best way to go about this. The gauge stick that you used earlier will also be needed in this step.
Use the gauge stick to draw the guidelines directly on the wall. They will serve as a map when you apply the tiles. At the end and sides, you may need to trim the tiles. Remember to mark the smaller ends on the wall, so you know how much to cut off.
Step 5 : Begin laying the tiles
The best way to go about laying the tiles in your bathroom is to work from the bottom upwards. Place one tile on the wall and add a tile spacer at its side. Also, draw on the back of your tiles, and not their front, so you don’t discolour them.
Laying the tiles should take only a few minutes, but remember to tile in rows.
Step 6 : Mix and Apply the Tile Adhesive
Without an adhesive, your tiles will not stay in place. Hence, it is essential that you get a good one that holds tiles firmly together and is waterproof. Most adhesives are already mixed on delivery. So, you wouldn’t have much to do at the end of the day. Use a notched trowel to apply the adhesive evenly on the whole area.
Step 7 : Add Wall Trims
Wall trims are useful in external corners. For a professional finish, this tiling material is preferable. Cut it into the desired size, then use some adhesive to fit it. Using a scraper would firmly place the trim on the adhesive, and a secured trim helps to prevent leaks in your bathroom.
Step 8 : Mix and Apply the Grout
When tiling a bathroom, do not forget to keep the grout close, so it can be used to seal the tiles. Put the grout in a bucket, then add some water and stir. Add more water if necessary. Once you get a thick mixture, then it is ready to use.
Use a sponge and a trowel to apply the grout. Focus on the exposed gaps on each tile, and work with small sections at a time. Make sure that it sinks into the section perfectly before you move on to other parts. It usually takes a few minutes.
Things to remember when tiling a bathroom
- Use good, quality tiles. The cheap ones will only last for a while before they start cracking.
- Make sure that the tiles are symmetrically laid out. Work from the centre outward.
- Don’t leave any edges exposed.
- Use the right tools when tiling.
- Always determine the layout before you begin the process.
- Remember to use tile spacers.
In conclusion
These are the steps to follow when tiling your bathroom. If you do not have the time or don’t feel comfortable about doing it yourself, then it is advisable that you reach out to a professional to complete the tiling work for you. Whilst this may be more costly, you are almost guaranteed to be happy with the results providing you choose a reliable & experienced tiler.