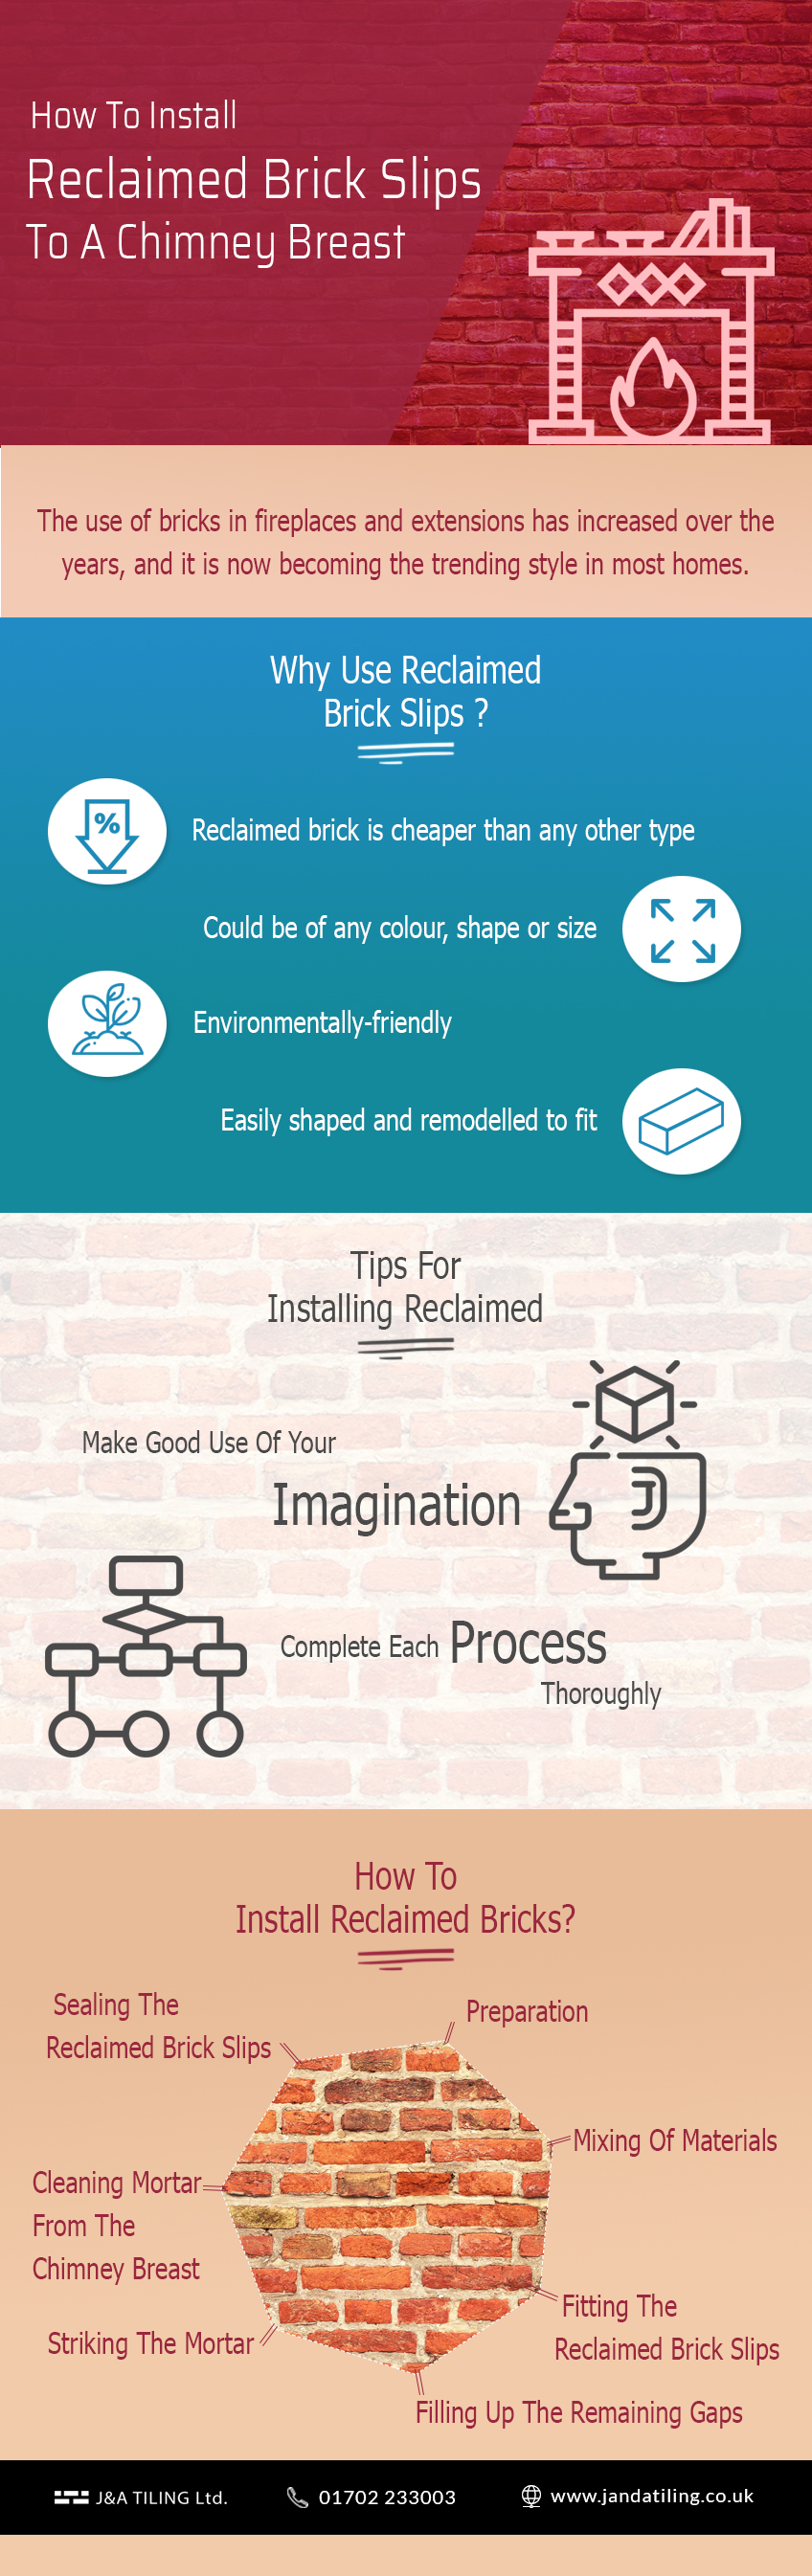
The use of bricks in fireplaces and extensions has increased over the years, and it is now becoming the trending style in most homes. Brick installations on chimney breasts are quick and easy. But what you do not see often is masonry that is made of reclaimed brick slips.
Fireplace extensions provide a focal point in a living room or lounge. But nothing can draw more attention and bring the space to life than reclaimed brick slips on a chimney breast. Reclaimed bricks slips are mostly reused artistically. The best part is that since these bricks are gotten from different sites, they carry a history with them.
Read through this article and find out how to install reclaimed bricks and why you should use them on chimney breasts.
Why Use Reclaimed Brick Slips On A Chimney Breast?
A lot of people are naturally drawn to antique pictures, silverware and art. Many of these pieces and artwork are commonly found in museums and not in homes. Unlike in other parts of the world, the UK has preserved the culture of using bricks in building many houses. But why should you even think of using a reclaimed brick slip in your house or furniture extension?
Reclaimed bricks are those bricks that have been used in a building before, and have been recycled to be used once more. This type of brick is usually gotten from demolished structures like hospitals, schools and houses.
For Commercial Brick Slip Installation – Call: 01702 233 003
In terms of its cost, a reclaimed brick is cheaper than any other type in the market. This is because they can be gotten from anywhere, and could be of any colour, shape or size. Unlike freshly made bricks, reclaimed brick slips have developed characteristics. This is because they have withstood the test of time and weathering conditions. Fireplace extensions need to be made from strong and tough materials to direct the heat properly to the room. Reclaimed bricks from sites are the ideal materials to suit this requirement.
Reclaimed bricks are also environmentally-friendly. After the demolition of a brick building, little is left behind to be recycled or reused. These bricks, that are gotten from sites, prevent the wastage of and maximise the use of building materials.
Lastly, for a dull-looking house, reclaimed bricks are perfect. The different blends of clay-like brown light up the chimney breast and make it attractive. They can also be easily shaped and remodelled to fit the fire extension of a house.
Tips For Installing Reclaimed Bricks On A Chimney Breast
-
Make Good Use Of Your Imagination
Knowing the type of material you would be dealing with (reclaimed brick slips), make sure put on your thinking caps. There is no strict law to follow when fitting brick slips on the wall. So, feel free to use the bricks in vertical and horizontal positions. Reclaimed bricks have different colours, so make sure they all blend well and achieve the right balance. Let your style inspire your chimney breast transformation.
-
Complete Each Process Thoroughly
Fitting reclaimed bricks on a chimney breast is not a process that should be rushed. You can liken it to building a house. If it isn’t done properly, the process could be an utter waste of time. Make sure that every step is carried out prudently. Also, ensure that the mortar dries and sticks well to the bricks.
How To Install Reclaimed Bricks On A Chimney Breast?
Proper planning must be done before installing reclaimed bricks to a chimney breast. The steps involved in this process are;
1. Preparation
This is the stage to get all the materials and tools you need to install the reclaimed bricks on the chimney breast. You also need to make the important decisions about your chimney breast, like its structure and number of layers.
You would need brick slips, tile spacers, a brick jointer, a mixing bucket, spirit level, a wooden batten, a string line, a notched trowel, floor covering and a brush. After gathering all these materials, then you can move on to using them.
Installation of any type of brick is a messy process, so you need to cover the floor around and underneath the fireplace extension. If you do not cover the floor, grout or adhesive could stick to its surface.
Read more: Fireplace Brick Slips
Next, wipe the walls of the chimney breast. There would likely be a lot of loose debris, dirt or dust on the wall’s surface. Remove these with the wooden spatter and a damp cloth. You don’t want debris to interfere with the bonding of the reclaimed bricks.
To complete the preparation process, you could use some chemicals on the wall. These chemicals, like PVA, clear the surface of the wall from debris and dust completely. You should use a sponge or brush to apply this chemical. After applying it, allow it to dry on the wall. However, if you think that this chemical would reduce the adhesive property of the reclaimed bricks on the wall, then do not use it.
2. Mixing Of Materials
After preparing for the installation of the bricks, the next step is to mix every material that you would use. Mortar is the most popular adhesive material that needs to be formed from mixed materials. Only mix a small amount of adhesive at a time, so it doesn’t dry up. Then, apply it to a portion of the wall that is to be worked on quickly. You may also apply the material at the sides of the reclaimed bricks so that it can stick to the wall easily. Use the trowel to flatten the mixture out on the wall.
3. Fitting The Reclaimed Brick Slips
You are ready to fit your bricks after applying the material to the wall or the reclaimed brick. Since chimney breasts have small openings at the bottom, it is best to start laying from the bottom. The rule of thumb is to start from the lower left portion and gradually move upwards by a layer.
Grab one reclaimed brick slip and slap it firmly on the adhesive-covered wall. Do this repeatedly over the area that is covered with the adhesive. The spirit level and string line should be used to keep a straight line when laying the bricks on the wall. Ensure that you fill the space between the bricks. Most adhesives dry quickly in air, so only lay a small portion at a time.
Fit the wall before the alcove. The corners can be fitted after the remaining part of the chimney’s breast has been covered. Always make sure that the adhesive sets properly before moving on to the next reclaimed brick slip. Use the wooden batten to maintain an even surface.
You will find that you can work on larger areas as you progress, but don’t get carried away. Give yourself time to get the best results.
4. Filling Up The Remaining Gaps
No matter how careful you have been when fitting the brick slips on the chimney breast, there would still be space between them. Mix mortar in a bucket, and then apply it to the gaps. Unlike in the previous step, make sure that all the gaps are completely filled up.
When filling up these gaps, ensure that the mortar does not stick to the faces of the brick slips. Hence, carry out this process with a bag or a gun. Again, carry out this fitting on a small area first to make you comfortable with the application process involved.
Leave the mortar to dry up for about 30 minutes. However, if it is very thick, the mortar should be left for about an hour.
5. Striking The Mortar
After the mortar that was applied to the joints has dried, excess of it can then be removed using a brick jointer. Use the curved end of this tool to strike out the excess mortar by gliding over the surface of the joint. Perform this process over the horizontal and vertical joints of the chimney breast.
6. Cleaning Mortar From The Chimney Breast’s Brick Slips
If you have followed the process above judiciously, then cleaning the mortar from brick slips should not take long. You would need an acidic solution to get any mortar off from the surface.
7. Sealing The Reclaimed Brick Slips
In many situations, a sealant is applied on the bricks of the chimney breast. This is done to ensure that the heat from the fireplace does not affect the mortar negatively and cause it to melt. Sealing brick slips helps to make it easier to clean and prevents them from being stained. An appropriate sealant will reduce the ability of water to pass through the reclaimed brick slips.
Final Look: A chimney breast that has been installed with reclaimed brick slips is a sight to behold. The masonry has an authentic look with the right properties that would embellish any house.
In Conclusion
Chimney breasts are important parts of homes in the UK. It is ideal that they have a proper look and are installed with the right type of materials. Reclaimed brick slips provide the strength and durability required in these masonries. Follow the steps listed above to install reclaimed brick slips in your chimney breast.